Chapter 8: Modifying State
Adding stuff#
So far, we created a Store, put some initial State in it, and displayed it in our component UI using Selectors. One part that is missing is that we haven't done much using our Reducer besides registering it in AppModule. Now it is time to add some categories from our UI. As mentioned previously, to trigger the Reducer function, we need to dispatch an Action on the Store, and then the corresponding Action handler will be called, modify the State and propagate the changes all the way up to our UI.
Before we proceed#
First of all, let's build a small UI that wil allow users to add categories. In the category-list template we are going to add an input in which the user can enter a name of the new category, and a button next to it that, when clicked, will add the category. We are using Angular Material, so let's build that UI. Let's add the MatInputModule and MatButtonModule in our AppModule first, and also the FormsModule to be able to read data from the inputs:
// src/app/app.module.ts
// other imports omitted for brevityimport { MatInputModule } from "@angular/material/input";import { MatButtonModule } from "@angular/material/button";import { FormsModule } from "@angular/forms";
@NgModule({ // other metadata imports: [ // other imports MatInputModule, MatButtonModule, FormsModule, ],})export class AppModule {}Now we can use the nice and shiny Material Input and the Button in our UI. Let's add those to our category-list-presenter component template:
<--src/app/category-list/category-list-presenter/category-list-presenter.component.html--><mat-list> <mat-list-item *ngFor="let category of categories" >{{ category.name }}</mat-list-item ></mat-list><mat-form-field> <mat-label>New Category Name:</mat-label> <input matInput [(ngModel)]="newCategoryName" /> <button mat-button (click)="addCategory()">Add Category</button></mat-form-field>As you see, we have added an input, bind it to a class property named newCategoryName, and will call a class method named addCategory when the button is clicked.
As you remember, our presenter component does not add or modify the data on itself, is just receives the data and emits events. So when the button is clicked, we will emit a custom event that notifies the container component to add the category. Let's change our presenter component class code:
// src/app/category-list/category-list-presenter/category-list-presenter.component.tsimport { Component, Input, Output, EventEmitter } from "@angular/core";import { Category } from "src/app/state/models";
@Component({  selector: "app-category-list-presenter",  templateUrl: "./category-list-presenter.component.html",  styleUrls: ["./category-list-presenter.component.scss"],})export class CategoryListPresenterComponent {  @Input() categories: Category[] = [];  @Output() categoryAdded = new EventEmitter<Category>();  newCategoryName = "";
addCategory() { this.categoryAdded.emit({ name: this.newCategoryName }); }}Pretty simple. Now, let's change the container component so that it listens to this event, and dispatches a corresponding Action to update the State:
// src/app/category-list/category-list-container/category-list-container.component.tsimport { Component, OnInit } from "@angular/core";import { Store } from "@ngrx/store";
import { addCategory } from "src/app/state/actions";import { Category } from "src/app/state/models";import { categories } from "src/app/state/selectors";
@Component({  selector: "app-category-list-container",  template: `<app-category-list-presenter    [categories]="categories$ | async"    (categoryAdded)="addCategory($event)"  ></app-category-list-presenter>`,  styleUrls: ["./category-list-container.component.scss"],})export class CategoryListContainerComponent implements OnInit {  categories$ = this.store.select(categories);
  constructor(private readonly store: Store) {}
  ngOnInit() {}
addCategory(category: Category) { this.store.dispatch(addCategory({ payload: category })); // this is where the magic happens }}There are two notable changes, first is the addCategory method that listens to the categoryAdded custom event from the presenter component, second is this line:
this.store.dispatch(addCategory({ payload: category }));As promised, magic happens here. We already covered that in order to trigger a State change, we need to dispatch and Action, and that is precisely what we have done, using the Store's dispatch method. It passes the Action (together with the payload) to the Reducer function, the corresponding handler is being called and generates a new State, then it propagates that change though the Observables we used with Selectors, and shows the result in the UI. We have already written the Reducer code, so go on and try our new feature out there in the UI.
Awesome, right?
This diagram illustrates how the whole thing works:
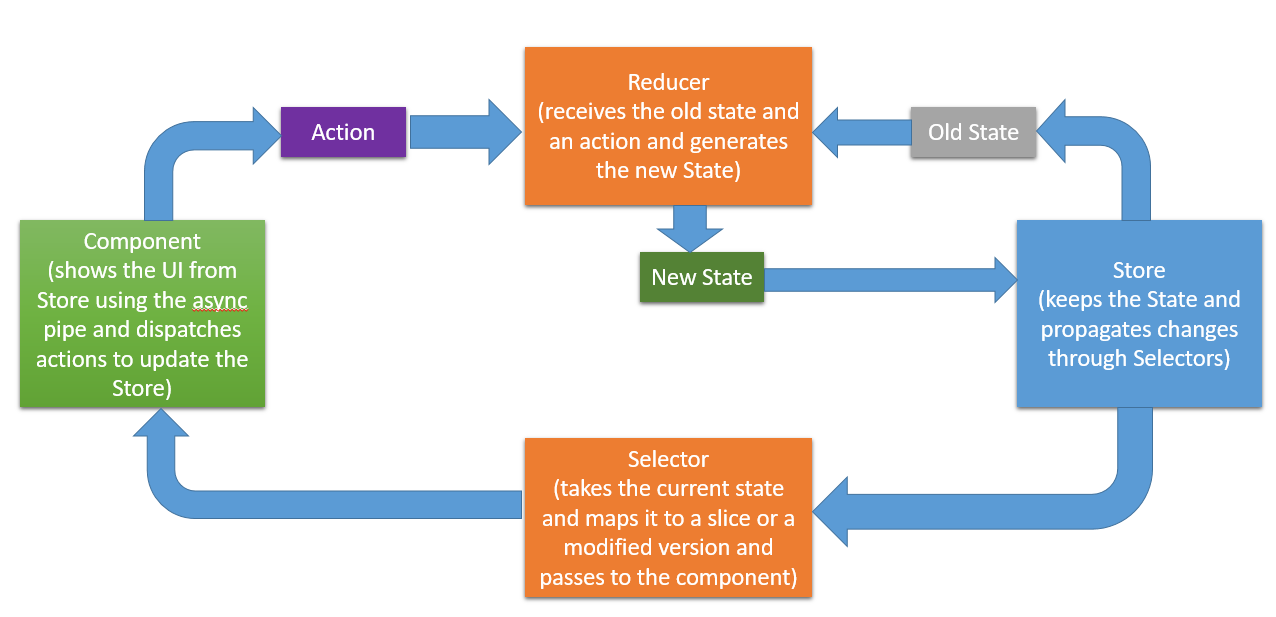
This showcases the whole process we described:
- Component dispatches an
Action Reducertakes the oldStatefrom theStoreand theActionReducercreates the newStateand puts in theStoreStoretriggers theSelectorsSelectoremits the new derivedStateto the component via anObservable- Component displays the new data with the
asyncpipe
And that's it
Homework#
We created a flow in which the user can add a category. Now it is time for you to add a low in which the user can delete one. We already have the Action responsible for this and the handler in the Reducer, so go on and
- Add a delete button in front of every category item in the UI, which will emit a new
categoryDeletedevent to the container - In the container, dispatch the
Actionthat deletes the category and observe the results
We have come full circle now and can read, modify and select State. In the upcoming chapter, we will lay some groundwork so we can start interacting with remote APIs using NgRx.
Exercise 1 solution
export class CategoryListPresenterComponent {  @Input() categories: Category[] = [];  @Output() categoryAdded = new EventEmitter<Category>();  @Output() categoryDeleted = new EventEmitter<string>();  newCategoryName = "";
  addCategory() {    this.categoryAdded.emit({ name: this.newCategoryName });  }
deleteCategory(categoryName: string) { this.categoryDeleted.emit(categoryName); // emitting a delete event }}<mat-list> <mat-list-item *ngFor="let category of categories"> {{ category.name }} <button mat-button (click)="deleteCategory(category.name)">Delete</button> </mat-list-item></mat-list><mat-form-field> <mat-label>New Category Name:</mat-label> <input matInput [(ngModel)]="newCategoryName" /> <button mat-button (click)="addCategory()">Add Category</button></mat-form-field>Exercise 2 solution
@Component({  selector: "app-category-list-container",  template: `<app-category-list-presenter    [categories]="categories$ | async"    (categoryAdded)="addCategory($event)"    (categoryDeleted)="deleteCategory($event)"  >  </app-category-list-presenter>`,  styleUrls: ["./category-list-container.component.scss"],})export class CategoryListContainerComponent implements OnInit {  categories$ = this.store.select(categories);
  constructor(private readonly store: Store) {}
  ngOnInit() {}
  addCategory(category: Category) {    this.store.dispatch(addCategory({ payload: category })); // this is where magic happens  }
  deleteCategory(categoryName: string) {    this.store.dispatch(deleteCategory({ payload: categoryName }));  }}